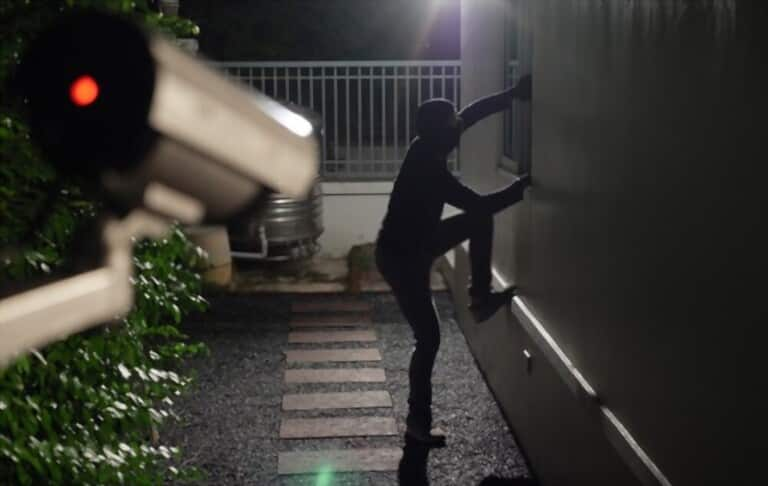
Installing security cameras is a way to keep an eye on things when you're not around. But you might think you wouldn't know the first thing about installing security cameras if you've never done it before. So we have listed some basic ways of choosing the right equipment, choosing the best location and installing them, and how to set up security cameras- Let us analyze them for you.
1. Choosing the right equipment
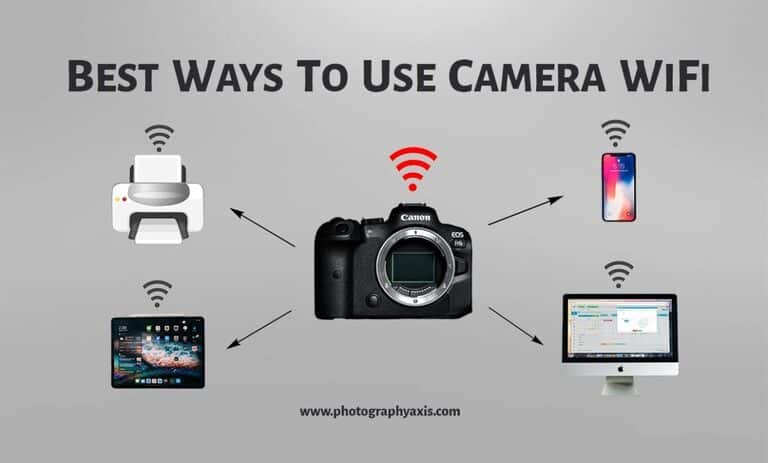
1.1 Using the wireless camera
In general, battery-powered cameras that use WiFi to transmit their footage are the easiest to set up, as there is less equipment and wiring to deal with. Furthermore, the best option is if only 1 or 2 cameras are needed instead of a larger system.
Footage from these cameras is also stored wirelessly, like some kind of cloud. You don’t focus on setting up the DVR storage device.
However, the disadvantage of wireless cameras is that it requires constant strong WiFi to work properly. Since they are mostly battery-operated, their batteries also need to be replaced from time to time.
1.2 Install a wired camera for a reliable connection and power
Although the installation process is a bit more complicated, cameras that use wiring to attach to power and storage devices are more reliable than wireless cameras. On the other hand, this is also the best way to create a security camera system somewhere with good wiring infrastructure, like a home or an office building.
In particular, wired cameras are often more expensive than wireless cameras due to the extra equipment. In addition, the DVR’s storage can also avoid any subscription fees that may be required to store footage wirelessly in the cloud. Because you need to install them near an outlet or other power source, wired cameras are not as versatile as wireless cameras when it comes to where they can be installed.
1.3 Camera system with alarms
If you don't plan on having someone constantly monitor the video feed from the camera, getting notifications when the camera detects motion is the only way to know about security events as they happen. These alerts can usually be sent directly to you and a professional monitoring service.
However, this service will contact you about the security event and will notify law enforcement if necessary.
Most camera systems that include notifications will also be accessible via a smartphone app, which can be used to monitor video feeds from anywhere.
1.4 Ensure night vision camera
On the other hand, if the camera is facing a location without any light, this will not be able to pick up any activity going on there. What is important is the process of planning to install security cameras outdoors. Also, be aware that cameras with night vision can be rendered ineffective by glare, so make sure not to install the camera near street lights or other light sources.
1.5 Choose a camera with a wide field of view for security
The larger the field of view, the more the camera can capture. For best results, use a camera with a 180-degree lens or with pan and tilt functionality.
1.6 Explore online reviews and recommendations for camera quality assessment
Many websites specialize in comparing and evaluating different security cameras that can be used to compare different cameras available and determine which one is the best. Search for "security camera reviews" to find these sites.
On the other hand, reading multiple reviews can help you get an overview of the product information. If its ratings are the same across multiple sites, it's probably a consistently high-quality camera.
1.7 Avoid choosing a cheap camera
Usually, the quality of a security camera is reflected in the price. If it's a cheap model, this most likely means it's not as high-quality or as effective as other security cameras.
2. Choosing places for installing the camera
2.1 Place the camera at the door of the house
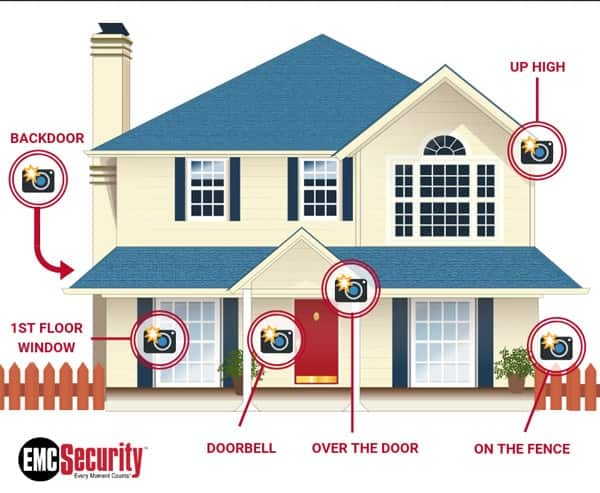
Strangers will try to enter the house through the front door or side entrance, so these are good locations to place cameras to catch or deter potential home intruders. Place the camera high above the door facing outwards so that the thief's face can be seen.
About 34% of burglars try to enter the house through the front door, so if there is only 1 camera, it is best to place it at the main entrance of the house.
2.2 Place the camera above the garage or driveway to monitor
Place the camera facing the car, whether it's in the garage or the driveway. Placing a camera in the garage will also cover another potential entrance to the interior.
If you leave a lot of equipment or valuables in the garage, make sure to place the camera inside the garage even if you don't leave your car in it.
2.3 Place cameras in public gathering areas to keep an eye on people in the house
Place the camera in the living room, kitchen, dining room, and any other place where you can keep an eye on family members. Great for keeping an eye on kids, babysitters, or home guests while away.
Prefer any room with large windows facing the outside, as these windows can also be used by potential thieves to break into the home.
2.4 Install the camera near the pet's sleeping area
This is only necessary if you have a pet that spends a lot of time somewhere other than the common areas of the house.
2.5 Do not place the camera in the bedroom or bathroom
While you may feel the best way to keep your children safe is to be able to keep an eye on them in their room, areas like bedrooms and bathrooms have the same expectation of privacy that security cameras will. weaken. If you're particularly concerned about your child's safety, consider alternatives to security cameras such as installing extra baby monitors and broken glass sensors.
If you're concerned about the well-being of older adults, consider investing in a personal medical alert system instead of a security camera. This will allow the elderly to contact emergency services directly if they need it.
However, you should not install security cameras in any place that might infringe on the privacy of your neighbors. You can get into legal trouble by recording your neighbors without their knowledge or consent.
3. Mounting and Wiring the Camera
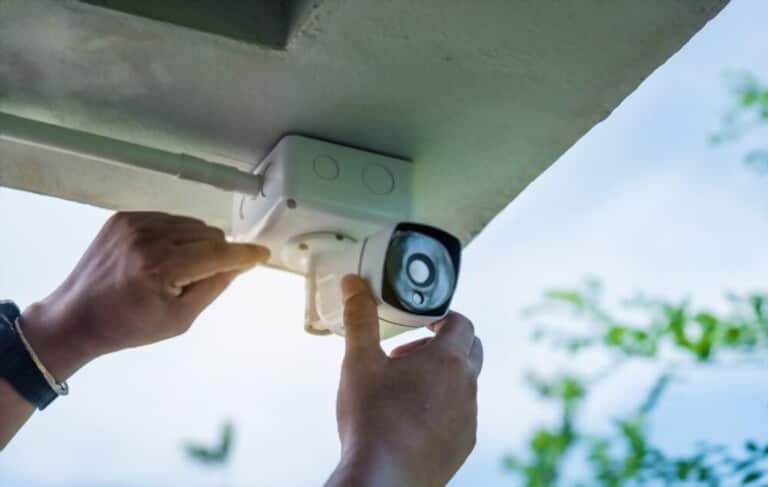
3.1 Choose a high vantage point whenever possible to secure the camera
Place the camera about 9 to 10 feet (2.7 to 3.0 m) off the ground to prevent interference with the camera. However, do not place the camera too high, or you may not see people clearly with it. Make sure the place you choose to assemble will be accessible for future repair.
3.2 Make sure your planned camera placement is near a power outlet if the camera is wired
You need to run the power cable from the camera to a nearby outlet or other power sources. Measure the power cable that came with the camera to see how close the camera should be to an outlet. If the power cable is about 6 feet (1.8 m), the camera will need to be mounted somewhere about 5.5 feet (1.7 m) away from a power outlet.
3.3 Use screws or adhesive pads to mount the camera on the wall
Use a screwdriver or drill to attach the camera mount to the wall using the included screws. If the camera comes with an adhesive pad instead of a screw, simply remove the plastic cover from the adhesive pad and stick it on the wall. Hold it there for at least 30 seconds before letting go.
If you're using screws to attach the mount to the wall, screw into the nail behind the drywall for best results. If you are installing a small hidden camera somewhere other than a wall, please skip this step.
3.4 Attach the camera to an outlet or power source
Route the power cable from the camcorder to the previously identified socket. If you plan to hide your camera from view, be sure to hide the power cable as well. Like you need to run cables behind tall bookshelves or long posters if the camera is installed indoors. If outdoors, consider drilling a hole in the wall and threading the power cord through this hole to the power source.
3.5 Run a video cable from your camera to the storage device
If buying a wired camera, it should come with cables labeled "Camera" and "DVR" on either side. Plug these cables into the camera and DVR device by plugging the opposite ends of the cables into the devices indicated by the respective labels.
3.6 Repeat this procedure for any other camera
If you're installing multiple cameras, be sure to adjust the angle so that they all cover different areas of your home or business. It will minimize the amount of duplication between different camera feeds and keep the home or business as secure as possible.
4. Camera settings
4.1 Choose a high, wide angle
The corner in any room usually looks down from the corner where the ceiling meets the walls. You need to see all entries and exits and that the camera is near a power outlet. If you are mounting an external camera, place it above 10ft so it cannot be knocked down easily.
4.2 Mounting the camera to the wall
Usually, cameras come with adhesive pads to adhere the camera to the wall, but screwing the camera is safest for long-term mounting on flat surfaces. All cameras can be different structure, most of them might be mounted the same way:
Putting the mount on the desired position
Utilize a sharpie, then make marks on the wall so you can go for the screw.
Drill a hole for each screw with an electric drill
Hammer in any cast pin.
Screw the mount to the wall.
Position the camera at the angle
4.3 Attaching the camera to a power source
Almost all cameras come with a power adapter that plugs into a normal wall outlet. Plug the small, round end of the power input into the back of the camera and the other end into the socket. If the power adapter is missing or damaged.
4.4 Attaching a wired camera to the DVR
Almost all monitoring devices are connected using a BNC (Bayonet Neill–Celman) connection. BNC cables are easy to use - they are also identical on both sides, you just simply plug them into the appropriate port, turning a small nut at the end to lock it in place. Plug one end into your camera's "output" and the other end into one of your DVR's "input" ports.
Note the plug-in input - is the DVR input that must be set to view the camera's video. If the cable doesn't have a BNC connection, a simple BNC adapter can be purchased online or at a hardware store.
4.5 Linking the wireless camera to the computer
This means that the wireless camera will come with a disc of software that needs to be installed to view its feed. Follow the on-screen instructions to access the camera.
Some cameras have a small receiver that attaches to your computer via a USB port. You should make sure that they are attached correctly.
Write down your camera's IP address (Exh 192.168.0.5) if provided - This number can be entered into any web browser to view your camera remotely.
4.6 Attaching the monitor for the DVR
This connection also often uses BNCs, some DVRs can be attached with HDMI or coaxial cables. Using your preferred connection, attach one end to the DVR's "output" port and the other to the monitor's "input". You can also connect multiple cameras like a DVR with input, which will automatically record every camera you install. However, pay attention to the input that you want to plug in.
4.7 Troubleshoot any connectivity issues
Check that the camera, DVR, and monitor are all connected to the power source and turned on. Make sure the cable is securely attached and that the correct input for the DVR is selected.
Conclusion
Through the tips that we share on how to set up security cameras, depending on the structure of your home and your needs, you can connect ladders or wires, call a professional or install a security system package. There are still some places where secretly recording someone's voice but not their image can be illegal, even on your property.


